Bleed refers to your artwork that is extended between 2mm. If you do not give a bleed, your artwork / text will be cut off. The bleed is to ensure that your artwork / text will not be cut off after trimming. Your text must sit 5mm from the edge of the artwork to avoid the text being cut off in the final print. .
How to apply bleed
Stretch your artwork by 2mm. The text should sit 5mm away from the edge of the artwork excluding the bleed area.
What programs can you add bleed too?
Adobe Illustrator
- Open Adobe Illustrator and click File > New.
- Enter the TRIM dimensions in the Width and Height boxes (For example, the trim dimension on a standard business card would be 90mm x 54mm)
- Enter 2mm for the top, bottom left and right bleed.
- Don’t forget to also set the Color Mode to CMYK and the raster effect at High (300 ppi) to ensure high resolution.
Adobe Photoshop
- Open photoshop and click File> New.
- Enter the full bleed dimensions, which is 2mm extra both vertically and horizontally.
- Don’t forget to set the resolution at 300 pixels per inch(300 DPI) and also set the colour mode to CMYK.
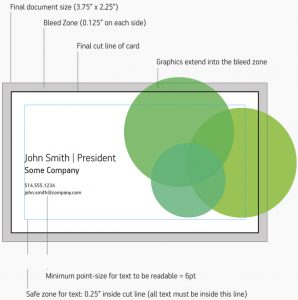
What are the zones of the bleed area?
Once you have set up your bleed area for your document you will notice that there are separate lines on the page. Known as the safe zone is the inner border of the piece this is where the majority of the design will go. Known as the cut lines and the lines you will use to cut the piece down and is the middle line Lastly known as the bleed area or the extended area for the background part of the image.